Make your Christmas and New Year extra special with this soft, buttery, and airy Italian PandoroA must-have Italian sweet bread!

As the festive season unfolds and the air becomes infused with the delightful scents of cinnamon, nutmeg, and vanilla, our hearts yearn for the comforting embrace of timeless holiday traditions. Among the treasured classics that grace Italian tables during Christmas, there stands a golden star – the Pandoro. Much like its more famous counterpart, Panettone, Pandoro is a beacon of warmth, joy, and the sweet symphony of Christmas cheer.
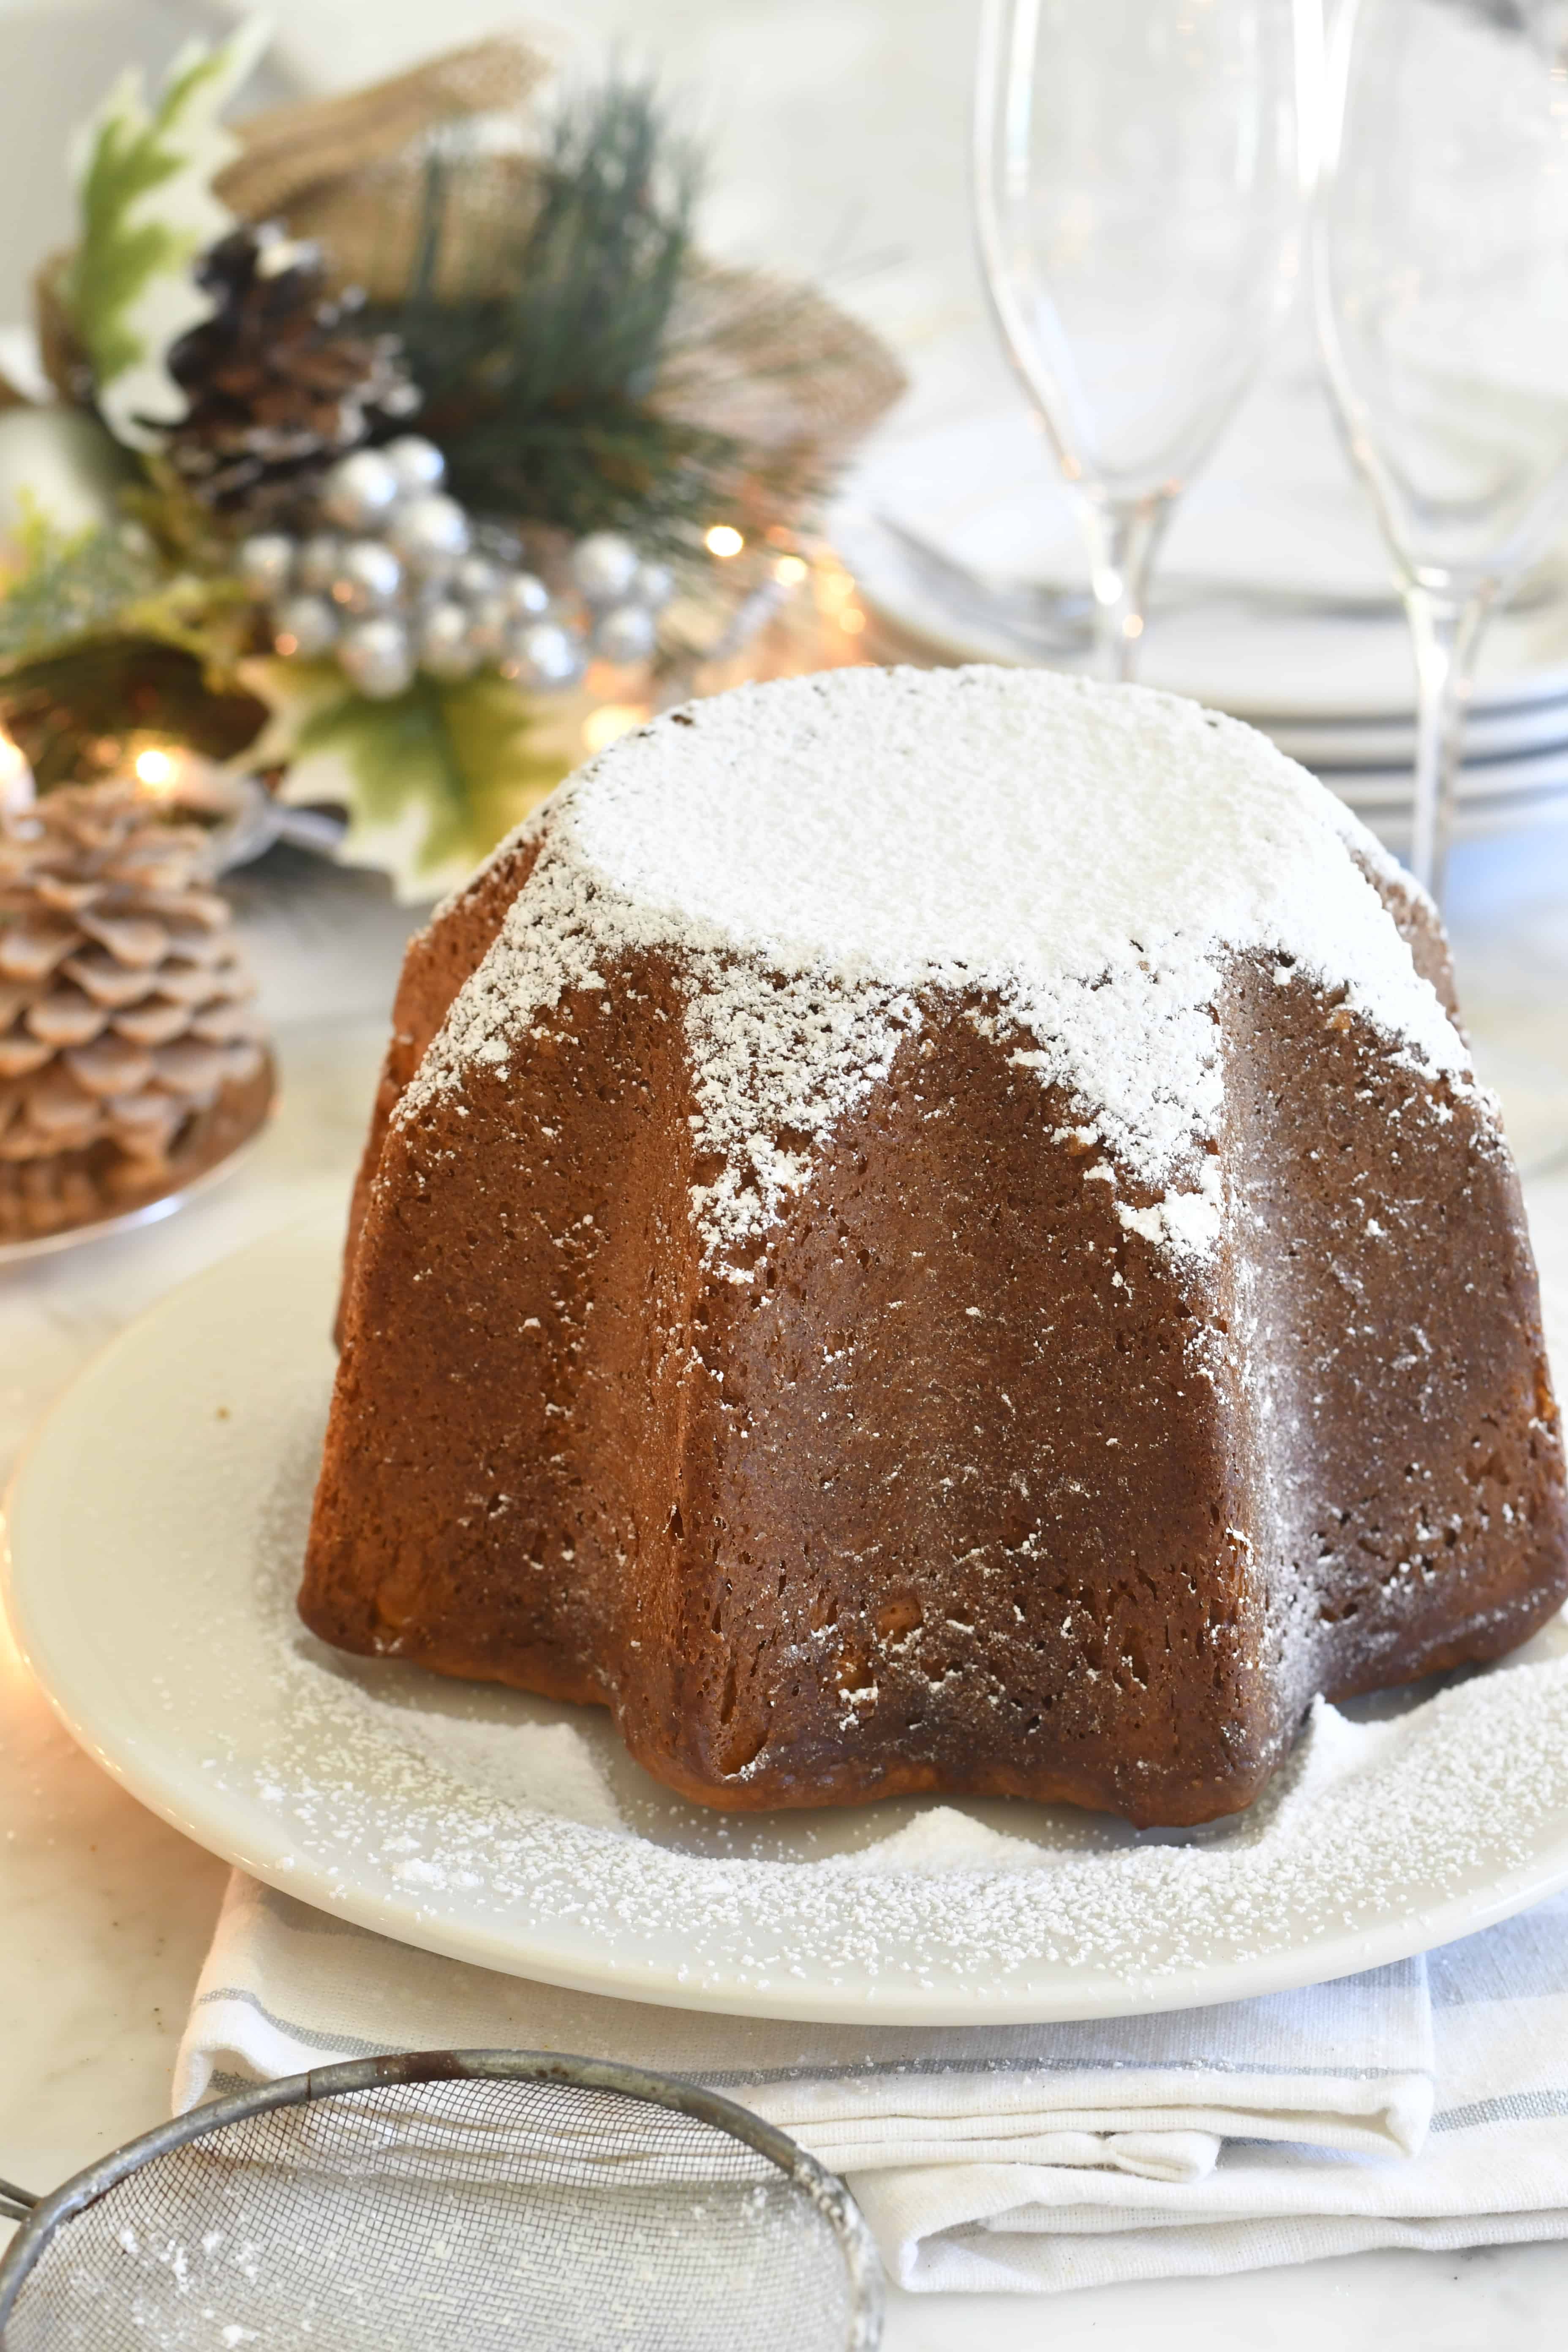
Pandoro, with its golden exterior, delicate aroma, and rich history, is a dessert that has become a symbol of festive indulgence. Just like panettone, pandoro is more of a sweet bread than a dessert/cake, but you can serve it at any time of the day.
Originating in Verona, Italy, the word "Pandoro" translates to "golden bread," (pan d'oro) a fitting name for a dessert that radiates warmth and splendor. The recipe has evolved over the years, but the commitment to quality ingredients and artisanal craftsmanship has remained constant.
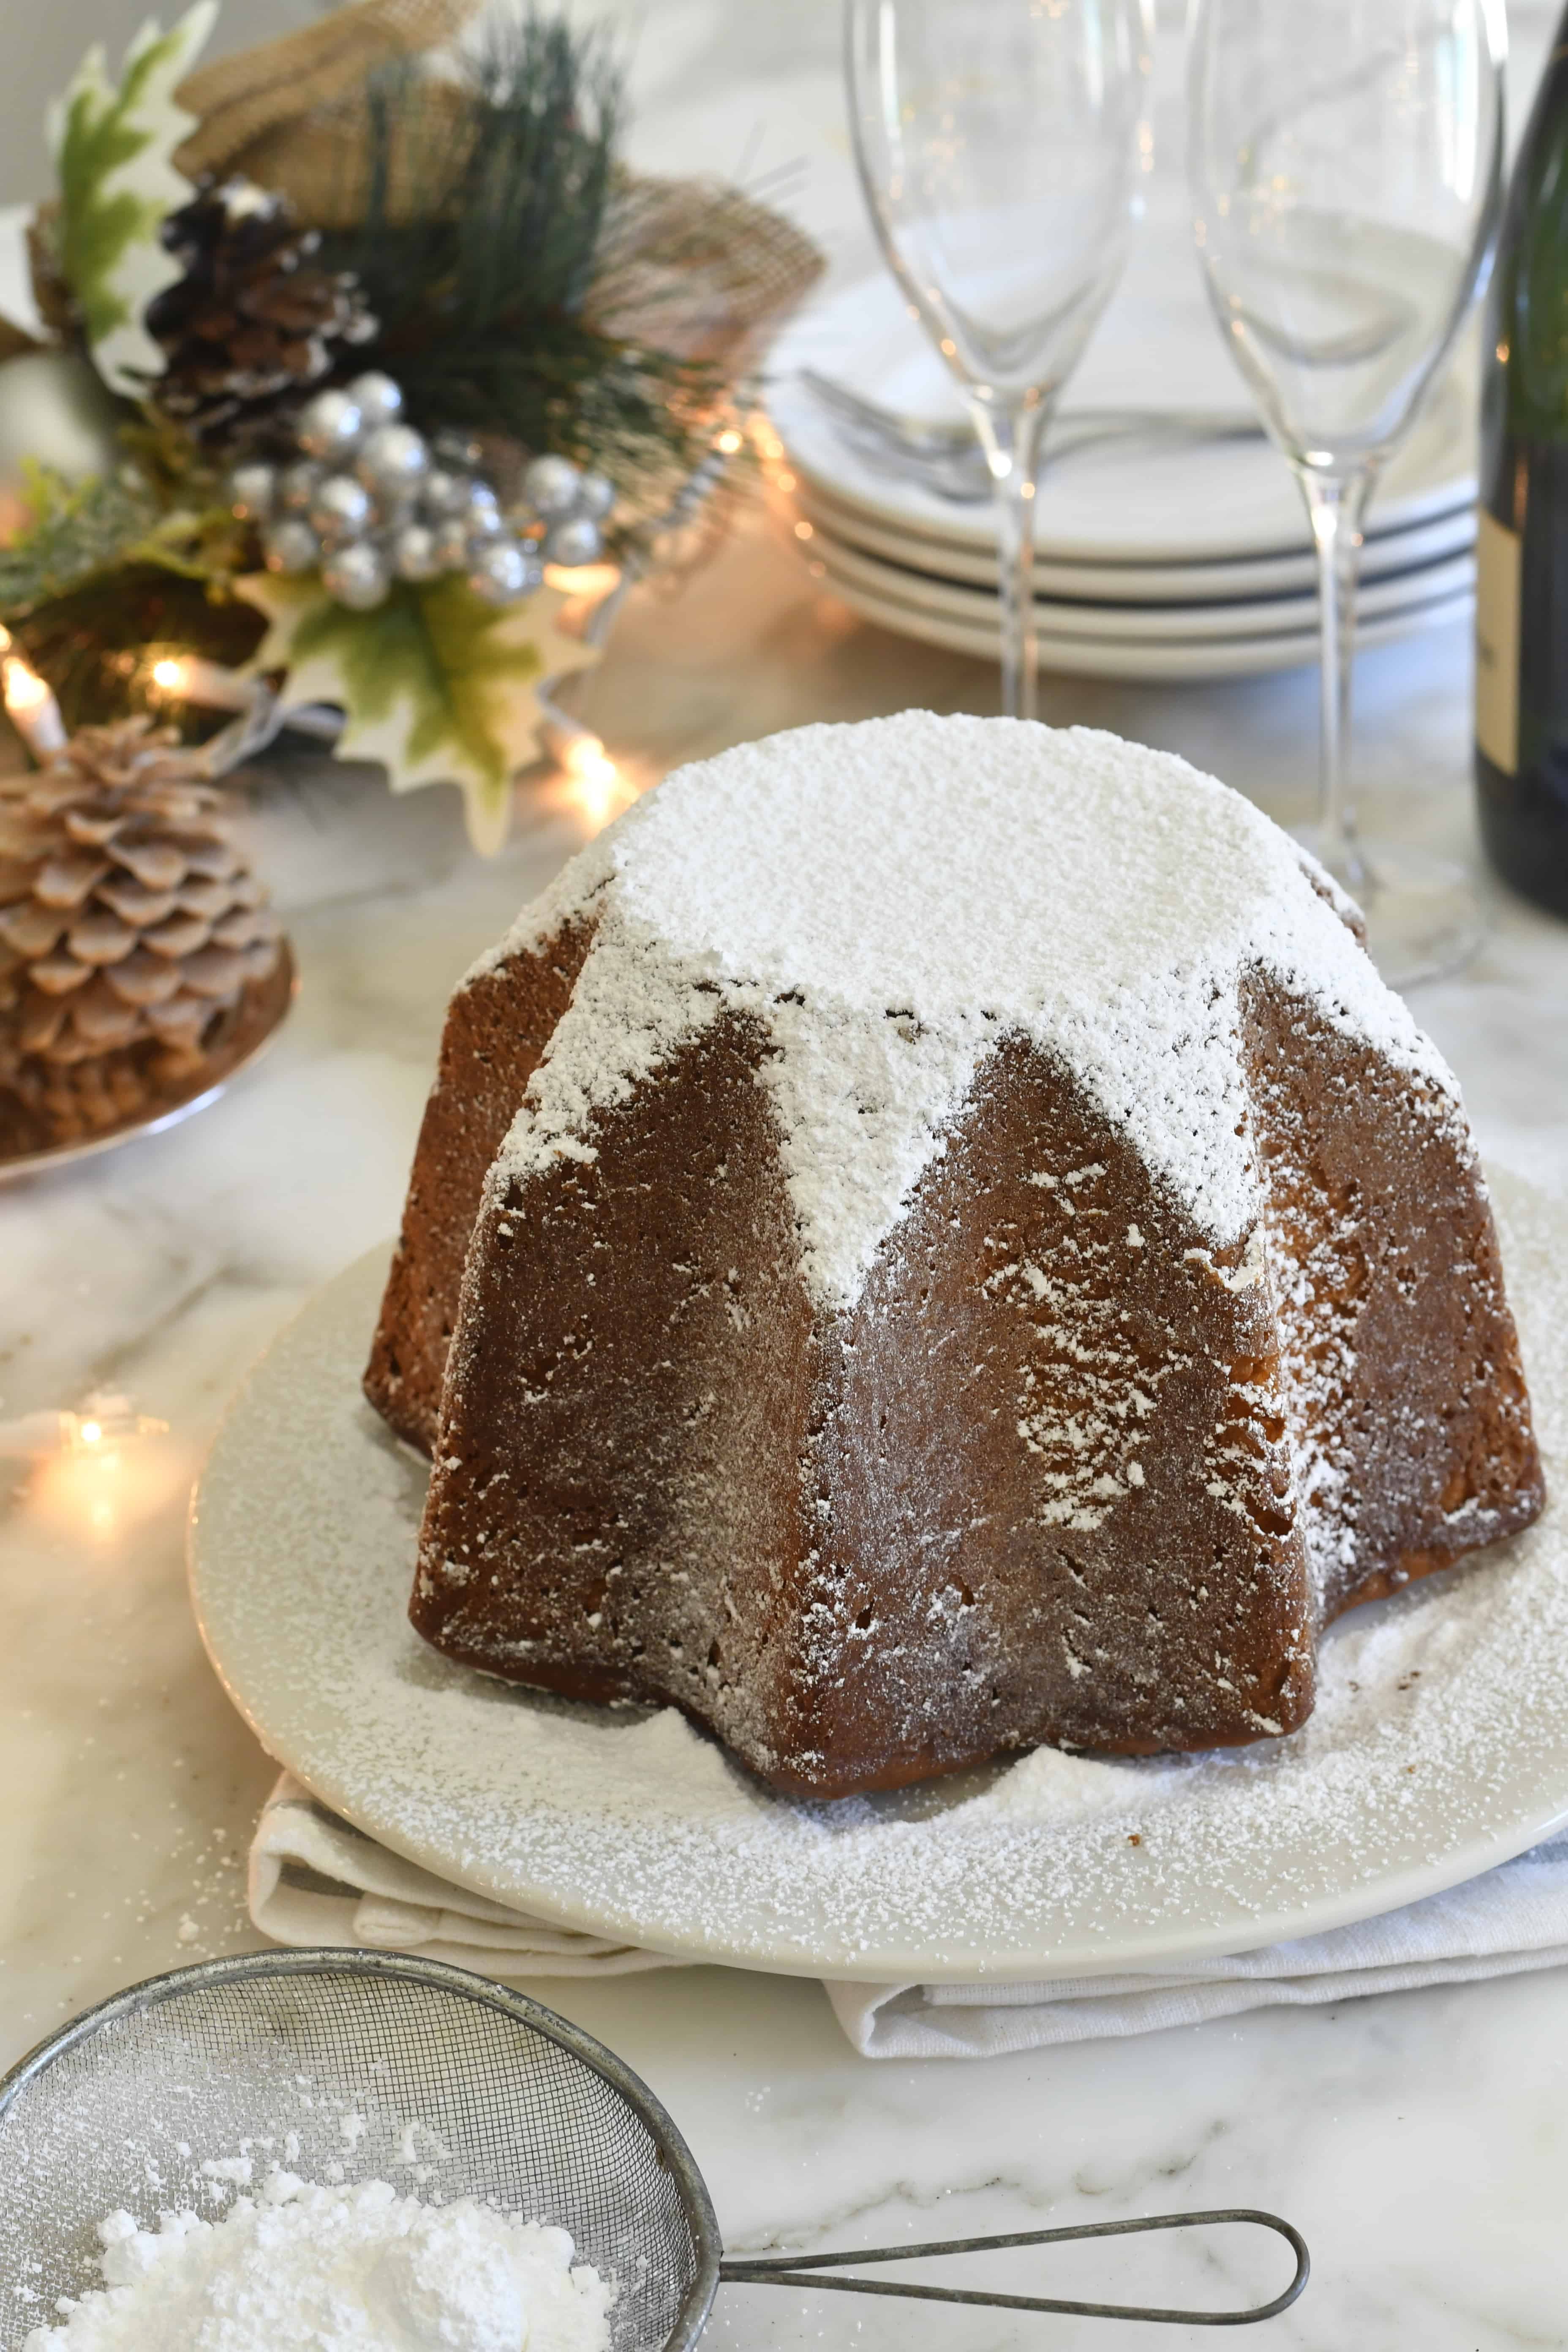
The iconic star shape mold gives Pandoro its signature appearance, resembling a Christmas tree when dusted with powdered sugar. Each step of the process is a testament to the dedication to preserving tradition and delivering an authentic taste of Italy
Last year I posted the classic panettone recipe AND a simple and "quicker" recipe for panettone, made into individual-size shaped muffins. Remember those?!? If want to try these, here is the Panettone recipe and the muffin-size small panettone.

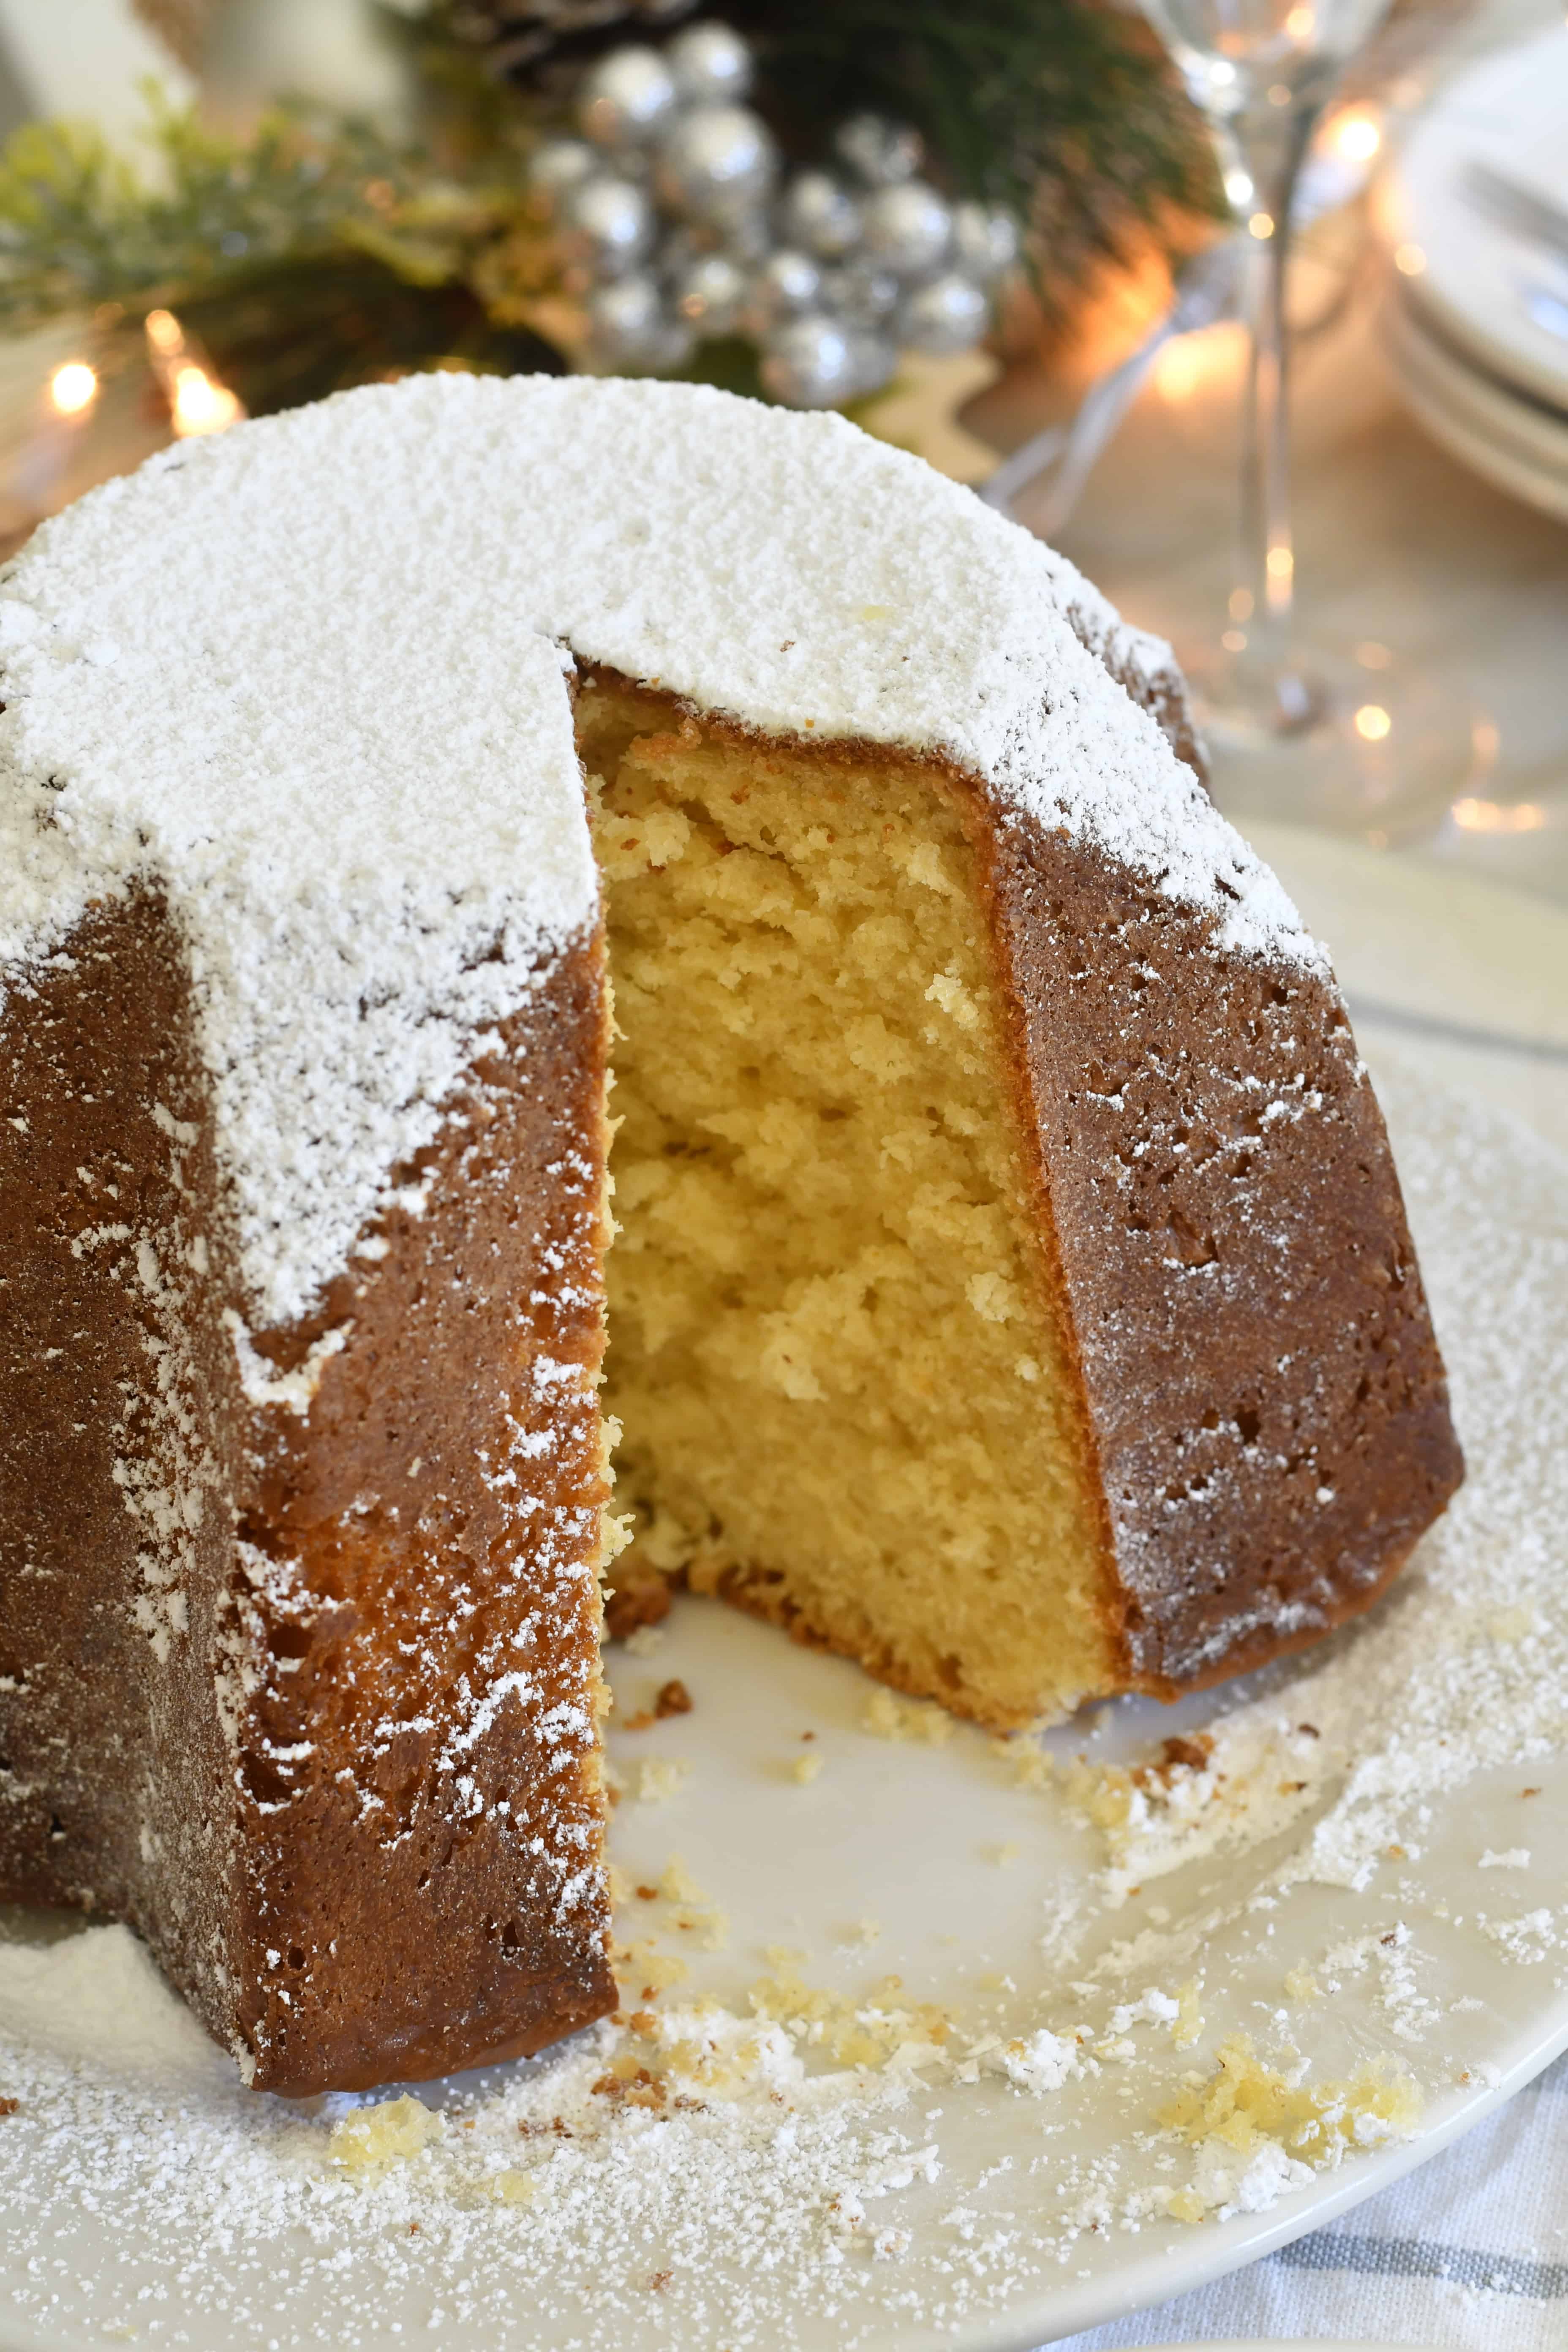
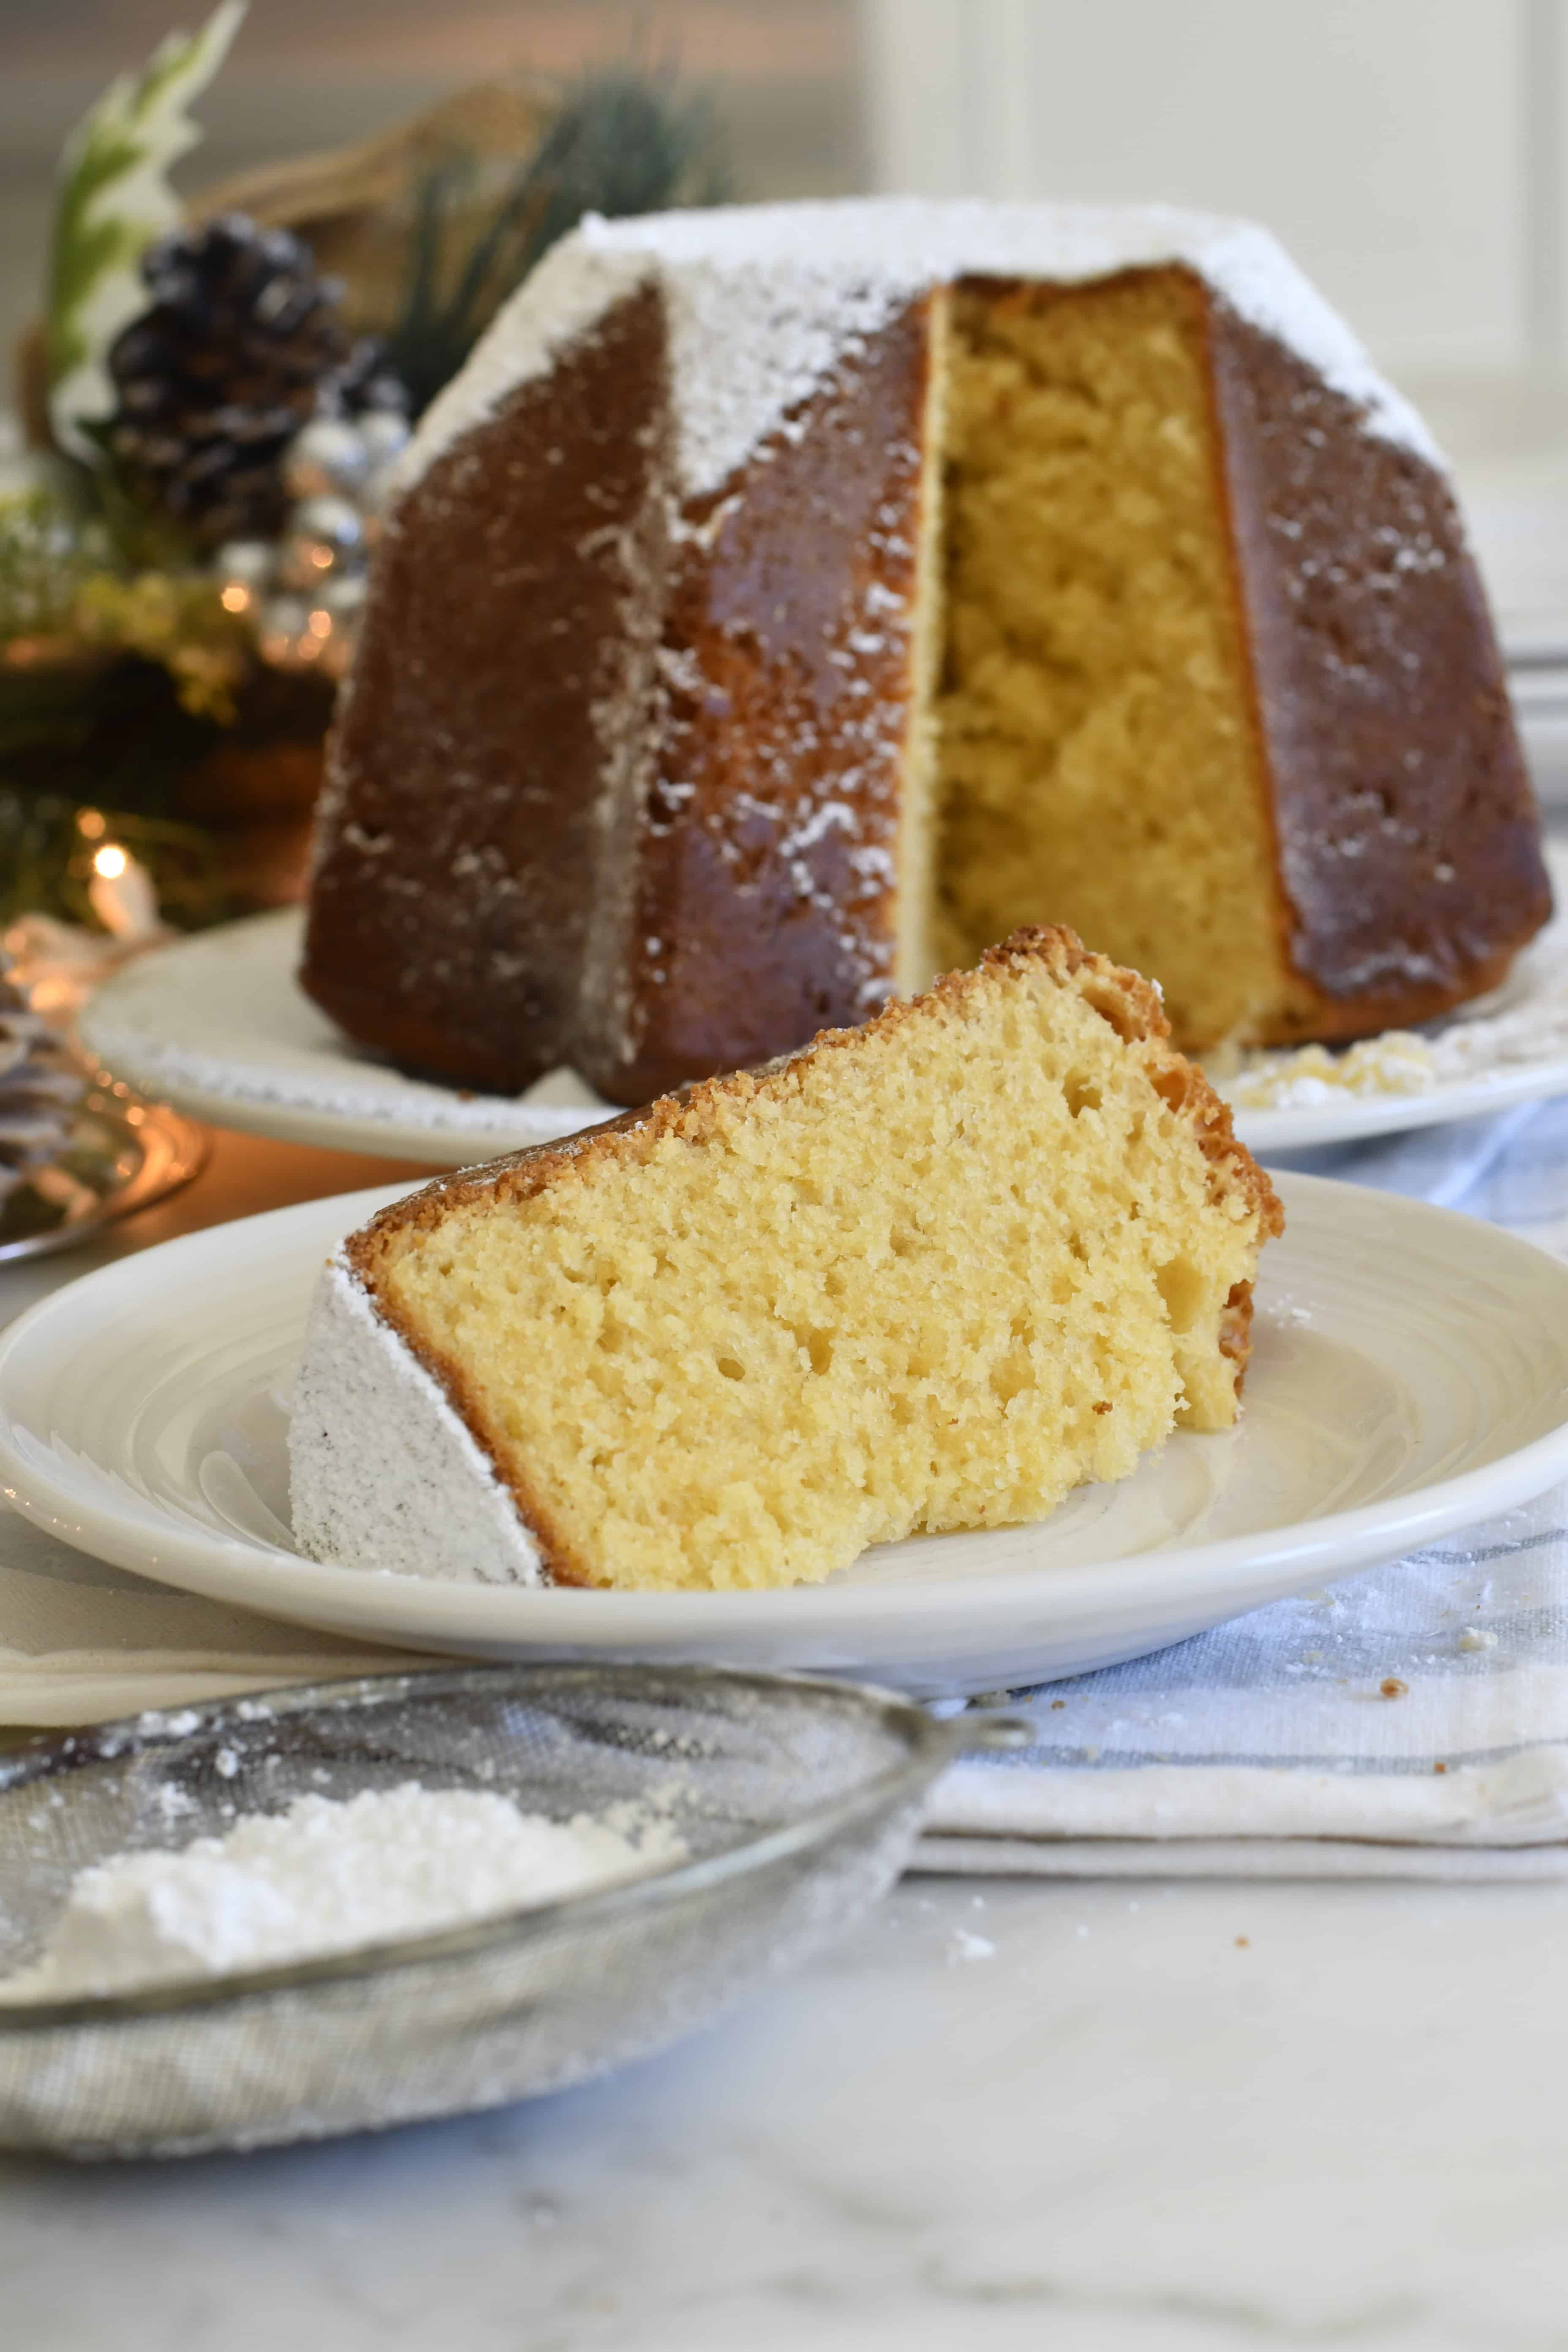
Today’s recipe yields an airy, soft, and fragrant BIG (1 kg) pandoro. I've simplified the original Italian recipe by using dry yeast for the dough (not the traditional pasta madre).
Using yeast allows us to make this recipe in a shorter amount of time (ready in about 24 hours). And it makes the process approachable to anyone (if you love baking and have the patience for it!).
-2.JPG)
With this recipe, you still get the same flavor and the same soft sweet pandoro. The only drawback of using dry yeast is freshness: this panettone will stay soft and fresh for about 4 days. While the traditional panettone made with pasta madre normally lasts for much longer - about 2 weeks.
The recipe for panettone is a little time-consuming, but it's really worth the work and waits.

Things you will need:
A star-shaped pandoro mold is a must to give this sweet bread its unique shape. This recipe yields a 1 kg panettone and this is the pandoro mold I bought on Amazon.
I strongly recommend using a stand-up mixer for your dough, so there's not really much work for you to do but add the ingredients and watch the dough come together. This is the stand mixer I have.
A kitchen scale is highly recommended. Please weigh the flour for a more accurate amount. Or pour the flour into the measuring cup so it won't be packed (and too much!)
Whether you weigh the flour or not, you may need to adjust the amount of flour once the dough comes together. Depending on the brand or quality of the flour, and the amount of moisture the dough might need a little extra flour.

There are three steps to making pandoro dough.
If you scroll down, you can find the complete printable recipe card below.
First step: I make the starter (also called biga). It takes only a couple of minutes to mix the ingredients by hand in a small bowl. Cover the bowl with plastic wrap and let the starter stand for at least 1 hour.
Second step: Transfer the prepared starter into the bowl of a stand mixer fitted with the dough hook attachment. Add the ingredients listed in the order indicated in the recipe. You will need to take your time and mix at low speed for about 10 minutes in total. Let this first dough rise for at least 2 hours or until doubled in size in a draft-free, warm place. Then place in the refrigerator for at least 12 hours.
Third step: Add the remaining ingredients (in order) into the prepared risen dough. Mix at slow speed until smooth for 10-minute intervals with a 5-minute pause in between (to avoid heating the dough)m until the dough is smooth and strong (still sticky).
Once the dough is ready, turn it onto the clean counter (no flour on the counter), and with your wet or lightly oily hands fold the dough onto itself several times (slap and fold method).
Please make sure to check my video recipe to see how I fold it.
If the dough is too sticky to handle, let it stand on the counter for five minutes. Let the dough rest for five minutes, and fold again.
Place the dough into the prepared pandoro mold. Cover with plastic and let rise for 4 to 6 hours in the oven (turned off) with the light on. If you wish, you can refrigerate overnight.
If so, remove from the refrigerator and let stand at room temperature for 1 to 2 hours before baking.
How to bake pandoro:
Preheat the oven to 350F (175C).
Bake in the lower part of the preheated oven. After the first 20 minutes check the panettone and cover loosely with aluminum foil if the top is already golden color and might get too dark.
When the panettone is almost ready, place a thermometer in the middle, center part of the panettone. Continue baking until the inner temperature reaches 197F (92C). Baking time should be around 40 to 50 minutes in total. Let cool completely before transferring to a wire rack and dusting with powdered sugar.
How to serve:
While Pandoro is undeniably delightful on its own, its versatility allows for creative culinary expressions. Sliced and toasted, served with a dollop of whipped cream, or a drizzle of crema inglese, Pandoro transforms into a decadent dessert. It also makes for a delightful addition to festive trifles, parfaits, or French toast, showcasing its adaptability in various culinary creations.
How to store:
You can store it in a sealed bag at room temperature for up 4 days.
So, ready to master the art of making pandoro?!? Remember to give yourself plenty of time for the dough rise. This recipe requires several steps and a few waiting times.
Just follow along, and be patient, and you will soon enjoy this amazing pandoro.
Happy baking!

No comments:
Post a Comment